Tag Archives: clutch

WELCOME TO ARTWALK!

Standard
WELCOME TO ARTWALK!

Saturday, April 22, I have the privilege once again of being the Featured Artist at Tina’s on the Strand for ArtWalk!  To prepare for this event, I’ve been sewing up a storm, and thought I would give you a sneak preview of the show.

SEA GARDEN

Sea Garden was designed from a modification of the Sara Lawson pattern, Arabesque.  Now a fairly large clutch, it was fashioned from turquoise faux crocodile and layed flowers from Mood Fabrics.  To achieve a breezy seaside effect, I added pearly shell trim and a delicately beaded zipper pull featuring a sparkly blue seahorse.

DRIPPING SPRINGS

Another bag featuring cool colors is the Dripping Springs laminated cotton bag which is adorned with clear beading that absorbs the color of the fabric underneath.  Obviously, I wish to get my hands on some more of this beading, as it will enhance any color I’m using!  This is the Pasadena pattern designed by Stephanie Prescott of A Quilter’s Dream.

ISLAND TIME

Island Time was created from the Alexander Henry fabric called “Mahalo Girls.” Whenever I sew a bag from this fabric, it seems to be very popular.  Must be the retro vibe. 🙂  Using my own pattern, the Jenny Bag, I fashioned a large version with leather handles and a flower from Michael Levine.   Red tassel trim adds the finishing touch.
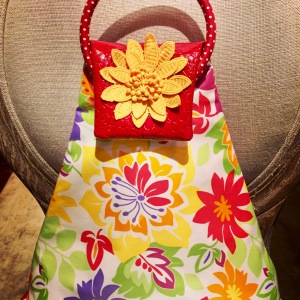
ISLAND GIRLS

Same fabric, and a completely different look for Island Girls.  This uniquely shaped bag pattern is from Amy Barickman.  This time I complemented with faux red crocodile, a bamboo handle, and a mother of pearl flower for a bit of island magic.

The pattern for Island Girls offers a unique backside opening.  I added this cute girl sporting sunglasses for a snazzy zipper pull. 🙂

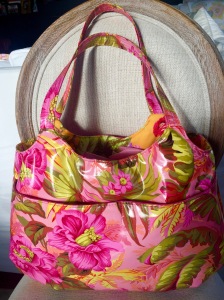
GIGI TOURS THE FLOWER MARKET

Another girl adorns the zipper pull on Gigi Tours the Flower Market, and she sports a shopping tote that made me think she would be touring the Paris flower market since she’s surrounded by floral fabric.  A large sunny bloom and a red polka dot handle add a playful note.

PLAYFUL PICASSO

Speaking of playful, Playful Picasso is adorable in person.  The picture doesn’t really tell the story.  On both  sides of this colorful upholstery fabric, there are deep pockets of yellow and blue faux crocodile, perhaps for sunglasses or a water bottle.  The blue, gold, and green ribbon fringe decorates the top which leads to patent leather handles, and the interior is lined with a bright blue polka dot cotton.  A super unusual and fun bag!

FANDANGLE

FanDangle is one of my favorites.  The pattern is from the quilting world, by Nancy Green.  The beautifully colored cotton is by Moda Fabrics.  This pattern was perfect for what is called a Layer Cake–10″ x 10″ swatches of coordinated fabric from the same line.  The gusset was cut from oilcloth featuring red cherries on a black background.  She sports a trim of black and clear beads, and in the middle is a dangling girl clutching  a time piece.  The design resembles a fan, and the featured embellishment is a dangling girl, hence I dubbed her FanDangle.

HOT TROPICS

(Back Side)

The last two bags are the CraftApple pattern, The Knotted Bag.  Hot Tropics is a combination of Philip Jacobs “Tropical” and a hot pink laminated cotton.  My embellishment tassel drawer offered a hot pink and green trim that complemented it perfectly.  However, since the trim was intended as piping, I needed another trim to cover the raw part of the piping that would normally be inserted between fabrics.  So I found a velvety pink rick rack in my stash and stitched it on top. 🙂

TAKE FLIGHT

(Back Side)

Same pattern, different fabric combinations.  “Jungle Fever” for Westminster Fibers is a delightful toucan design, that I paired with a glossy black laminate.  This is a wonderful sightseeing, shopping, and errand bag, since it offers a large exterior pocket and three generous interior pockets.  The lining is a lime green linen and the lime green clam shell charm is removable.

So, yes, I’m exhausted, but finished and happy and ready for Artwalk!  Hope to see you there!


Gone Fishing!

Standard

Last weekend we attended the most fabulous rehearsal dinner and wedding!  My nephew, Adam, married his beautiful, sweet bride, Natalie.  The whole weekend was just a magical fairy tale from the rehearsal dinner’s Corinthian columns and musicians from the Houston Symphony Orchestra strolling through the setting to the awesome wedding at the lovely church with reception at the Omni Hotel ballroom in Houston.

How does this relate to sewing?  The night before we left, I decided to sew a little bag to accessorize the dress I wore on Sunday.  I fashioned it from upholstery fabric!  Don’t know if I mentioned it, but just as Rick and I were leaving for our cruise in April, my good friend, Jeff, knocks on the door and presents me with a large bag of terrific upholstery fabric which he scored from a friend because he knows I sew purses. What a guy!  This fabric is very heavy duty, as you might imagine, and I created a small clutch wristlet with a fine corduroy lining and  red magnetic snap.  Although this purse turned out perfect for the occasion, I would use a lighter fabric for such a small bag in the future.

IMG_3071IMG_3072

The day after the wedding I planned to sew, but the upstairs air conditioner’s thermostat broke and it was 90+ degrees.  I brought lots of fabric and patterns and cutting utensils downstairs to the air conditioned dining room and spent all day and evening cutting.  (I’ve decided to pick up one of those cushiony kitchen mats to stand on for future cutting sessions.)  I used the same fabric you see here to cut a hobo style bag which will be so perfect if I find the ivory loop trim I want to embellish it.  I cut four other bags that await me in the sewing room.  (Oh, yes, Rick fixed the thermostat!  I have such a handsome handy man!)

One of the bags I cut was the Knotted Bag, all day style, from Craft Apple patterns.  You know I love this design, and when I saw the Brandon Mably fabric called Gone Fishing, I knew I had to use this pattern to accommodate the large fish swimming by.  I used the  Gone Fishing laminated cotton for the exterior and the Gone Fishing regular cotton for the interior.  I paired it with a plain slick red laminate for contrast on the bow, etc.  This is the perfect bright, happy, beachy fabric for Galveston and it is now at Tina’s for sale.  P.S.  That bag in Tina’s window from my last blog sold that very day I posted it!

IMG_3078 IMG_3084

I really, really, really, wish I had someone to sew the bags for me.  Not that I don’t like to sew!  It’s very satisfying and therapeutic.  But I have a zillion and one ideas for bags–I have the fabric, I have the patterns, everything.  I already have many, many bags pulled together, in this way, already for next winter.  The fabrics, patterns, buttons, trims, etc. are neatly grouped together and ready to cut and sew.  Here’s a tip:  When I do this, I go ahead and take a picture of these items so I don’t have to rely on my fantastic 🙂 memory when the time comes.  But when I see these projects, I feel frustrated by something called TIME!  I just want to use my time pulling together the fabrics, patterns and embellishing to create one-of-a-kind bags.  Each bag takes so long.  Tim Gunn has said that one of the criteria for Project Runway is speed.  I would never make it!  My favorite part, by far, is the creativity that comes with the initial decision-making process.  If I win the lottery (oh yeah, I keep forgetting to buy a ticket…)  I will start a business where I provide the sewing machines and everything necessary for seamstresses to make the bags.  They will be STYLED by It’s Sew Anny Designs!  Does anyone else feel this way??

Until then, I’m not Going Fishing–I’m sewing,  and happily sew! 🙂

Casting Call: Auditioning Fabrics

Standard

With the completion of my latest bag, Ruby Rose (Valentine’s Day is near), I thought I would share a glimpse of what happens in the beginning stages of the bag-making process.  My absolute favorite part is that first step when I pull a few fabrics together that work well.  That is, I need complementary colors and textures for both lining and exterior, and also need to consider the season.  In the winter I get to use my “sumptuous fabrics” like velvety chenilles, tapestries, textured leather, even corduroy.  My summer fabrics include a lot of the laminated cottons and silky cottons.  Now as you can see below, I have a lot of help at this stage.  Buddy has obviously worn himself out sorting through the winter fabrics!  And Kate, well you all know Kate savors sleep like a good steak!  So she’s testing out the texture of the doggie quilt I made her.  Must have felt good. 🙂

IMG_2051

IMG_2083

Next I decide which of my various patterns would put the fabric in its best light–large, small, shoulder sling, clutch, etc.  (Sometimes this step occurs first.  I may have just purchased a new pattern or sketched one, either on paper or in my imagination and I’m eager to try it.)  After I’ve matched fabric and pattern, I love searching for any trims that would enhance the look–colorful beads, fringe, piping, buttons, and a selection of closures all serve to make every bag unique.

IMG_2054 IMG_2055

During this step, I often use my cell phone to snap a picture to preview a combination (or to take pet pics.)   Taking a picture lets you figuratively step back and decide whether you’ve selected, for example,  too much trim or too little.  (If you’re a quilter you’re probably familiar with a device called a view finder which allows you to focus on specific parts of your project, sample frame it in different ways, and detect color values.)  This is the same principle.  In the views above, I noticed that the texture of this fabric was so rich that adding beading to the pocket would detract.  Sometimes a fabric like this seems to “speak for itself”–a deep red, thick, soft chenille. The fabric was already richly textured and the pocket alone would add dimension.

IMG_2086

Speaking of texture, I should mention that when a fabric is this thick (and I chose a similar lining which you see here) I use a “walking foot” to feed the fabric evenly.  This attachment was expensive but served me well through the years when I made quilts.  Also comes in handy with slippery fabrics.

IMG_2087

Now what you’re seeing above is a picture I took in one of the last technical stages where the lining is sewn to the exterior–a very satisfying stage, but with a bag like the sling above, I just wanted to give you an idea of how much it takes to hold these layers evenly  while they are all sewn together.  As you can see, I used three different kinds of clips–not because they were uniquely special in any way or served a different purpose–but because I didn’t have enough of any one of them!  I used those awesome Clover Wonder Clips, mini clothespins, and small binder clips.  Well…it got the job done!

IMG_2099

And finally, TA DA!   RUBY ROSE!  She  features a large external pocket, and one large and two smaller interior pockets and a magnetic snap.  Since the two straps are simply tied at the top, they are completely adjustable.  A thick red and gold braided piping was the only trim necessary.  And I’m already thinking of my next bag.  Man, I love that first step!!